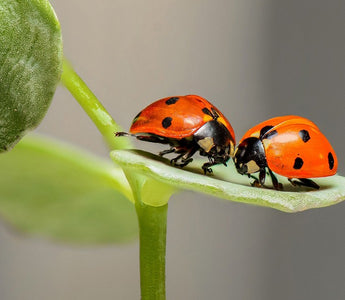
When it comes to macro photography, flowers and insects are the preferable subjects for many photographers. In this article, we are going to talk about some points you need to remember when you click macro photographs of insects. Here we go...
1. Best time to click:
The best time for insect photography is early morning. There is a saying that “the early bird gets the worm” and with photography “the early photographer gets the best shot of the worm”. The reason behind it is that early morning usually insects are less active and you have a better chance to capture them. Additionally, the light is warm and soft so you get vibrant colors in the pictures.
In winter mornings, insects are covered with dewdrops and that makes them less active and more beautiful. The second best time to shoot insects is after the rain, obviously for the same reasons as the morning. It’s cloudy, so the light is softer and insects are less active because they are covered with water drops.

2. Get closer:
In macro photography, the closer the shot, the better the picture. Well, you have three options to achieve this. First, use a true macro lens, it has a magnification ratio of 1:1 and a very short focusing distance so you can go very close to your subject. Second, use a longer lens so you can click from some distance and don’t disturb your subject. A 100mm macro lens is far better than a 35mm macro lens.
If you have a wide lens, and you have no option to take from some distance, try to go very slowly towards your subject so it won’t fly away. The third option is to take the picture from some distance and crop it in post-processing. Of course, you need a high-megapixel camera to do this.
3. Use creative angles:
Observe your subject and try to take pictures from different angles. Let’s say, you are taking a picture of a bee on a flower. If you take it from the top, the flower comes into the picture and will become the background.
However, if you take a photo of the same bee from the side, the background will be different and the flower will be not the dominant background in the picture.
If you take the same photo from the front, the point of interest will be the eyes and the shot will be entirely different.

4. Look for contrasting colors:
Always try to look for contrasting colors for the background and the sitting place of your subject. If you are capturing a yellow butterfly sitting on a pink flower, it’ll look amazing but if the same butterfly is sitting on an orange flower, it may not look good as both colors are almost the same and it’ll blend in the background.
5. Catch them in action:
Like humans, insects also have lots of work to do. For example, the bees collect nectar from flowers and convert it into honey, spiders make a web, ants collect food, and these daily activities of insects can be a good subject for macro photography.
When a bee sits on a flower to collect nectar, it is covered entirely in pollen and if you click that image, it looks amazing. You can also click insects when they are making love.

6. Focus on the eye:
Many of the insects have very large and detailed eyes, so when you click the picture of an insect, make sure that the eyes are in focus.

7. Don’t disturb the insects or try to control them:
Sometimes photographers try to move the insects so that they can get better background or light to click excellent pictures. It’s not a good practice and you should avoid it at any cost. By doing this, you may get stung and that can be very painful.
8. Study your subject:
Not all insects are the same and if you are trying to shoot any particular insect, it’s better to do some research about their behavior like where to find them, the time when they are most active or when they stay still, their mating time, how dangerous they are and what to do if they bite you.
9. Try to capture insects in flight:
Capturing an insect in flight is a very tough task, but the results are always very fulfilling. Well don’t worry, you too can achieve it. Just use a fast shutter speed, pre-focus on the possible flying path of the insect, use a tripod and click with burst mode.
You need to pan your camera along with the subject but try to hold the movement, when you press the shutter button because even a slight movement will show in the picture.
Nowadays, you can buy special equipment to capture insects in flight. It uses laser beams and clicks the picture automatically when some insects come between the beams.

10. Be safe:
When you are taking pictures, always remember that your safety is more important than the photograph. Keep a safe distance from the insects and don’t disturb them. Still, if you get stung by some insect, try to remove the stinger using your fingernail, clean the area and get help immediately.
11. Enjoy the process:
When it comes to shooting insects, it’s tougher than shooting flowers because unlike the flowers, insects keep moving and that’s why it’s challenging to focus and click. If you are not getting good pictures initially, don’t lose your heart and enjoy the process. With some practice and patience, you will start getting good pictures soon.

Camera settings for insect photography:
For insect photography, the best camera setting is aperture priority mode. Set the aperture according to the depth of field you want, set the ISO according to the light, and the camera will select the shutter speed automatically.
But sometimes this setting may give you trouble. If one of your subjects is in a dark place, the shutter speed will become very low and it will create motion blur.
The solution to the above problem is that you check the shutter speed in the viewfinder every time you press the shutter and Increase ISO in case of low shutter speed, or you can go with manual mode.
Put simply, the focus stacking is moving the point of focus over a subject in a number of small increments. During each small movement, you take a photo, usually working from the front of a subject to the back, and then merge these photos in post-production.Related Article 1: 7 Unique Macro Photography Ideas You Can Try at Home
Related Article 2: How to Capture Best Macro Photographs
Blog Credit: Ramakant Sharda
Ramakant is an Award-Winning Photographer, Author, Mobile Apps Publisher based in the beautiful “Pink City” of India, known as Jaipur. Many of his works have been published in magazines, newspapers, and international blogs. He writes about photography and also teaches photography in his workshops. He has published three (so far) coffee table books. Get his latest book Mastering High-Speed Photography.
Image Credit: pixabay


