


What would you do if you have a camera that has 576 megapixels resolution and a 10mm wide lens?
Would you believe if I say that you already own such a camera? I bet you don’t believe me. Well, God has already made a very advanced camera for us and it’s called our eyes.
Our eyes have 576 megapixels resolution and the field of view is around 180 degrees horizontal and 160 degrees vertical, which are equivalent to a 10mm wide lens.
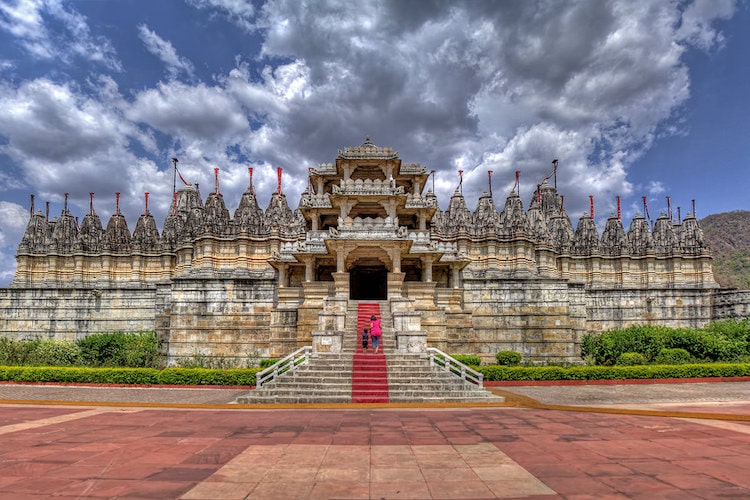
© Ramakant Sharda – http://ClickManic.com
Nowadays we can shoot wide angle shots with an 8mm or 10mm lens but we don’t have a camera that can click a picture at such high resolution. So, if you want to click a detailed picture like our eyes can see, do you have any option? Well, it’s possible with a photography technique called panorama.
In panorama photography, we click a series of photos and stitch them together to make a very high-resolution picture. With this technique and some special equipment, you can even create gigapixels images. So, let’s find out what you need to shoot a panorama and how to shoot it.

© Ramakant Sharda – http://ClickManic.com
Equipment:
You can shoot a panorama with any DSLR camera but lens choice is very important. If you choose a wide angle lens like 16mm or less, it’ll cover the entire scene in fewer shots and you’ll end up with a low-resolution panorama. A 16mm lens can cover a 360-degree scene in just 6-7 shots.
Pros of wide angle lens: Fewer shots, faster and easy editing, more vertical coverage
Cons of wide angle lens: Lower resolution of final image, more chances of parallax error
If you choose a longer lens like 100mm, you need to take lots of shots to cover the entire scene, vertical coverage will be very less and then you’ll need a powerful computer to stitch those images. So such a long lens is absolutely a no-no.

© Ramakant Sharda – http://ClickManic.com
In an ideal condition, a 24-50mm lens is a good choice. With a 50mm lens, you need to take around 18 shots to cover the 180-degree field of view.
See the image below, Red ones are 16mm pictures and as you can see only 6 photos are covering the entire view. Blue ones are 50mm pictures and it required 18 pictures to cover the whole scene. But in the case of red, vertical coverage is very large.
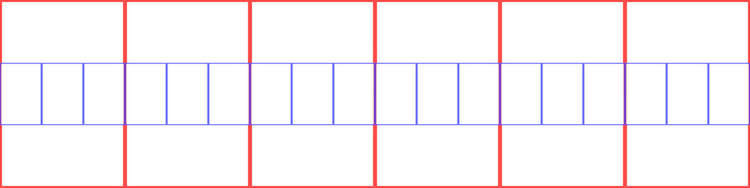
© Ramakant Sharda – http://ClickManic.com
In nutshell, you need to select focal length according to your requirement and the scene.
Other than camera and lenses, a steady tripod is a must for panorama photography. If you are shooting landscape, you may use ND filters to show smooth motions and circular polarizer filter to enhance colors and reduce glares.
© Ramakant Sharda – http://ClickManic.com
Settings:
All the equipment are ready, let’s talk about the settings. You are going to shoot a series of pictures and stitch them together so it’s absolutely necessary that all pictures have the same exposure, color, and focus. So, you need to do manual settings for everything in the camera.
First set your camera on a tripod. Here you need to remember two things. First, your camera should be vertical and second, it’s absolutely straight. A little bit of tilt will ruin your picture because you don’t want a picture with the tilted horizon. Use a Bubble Spirit Level to level the camera.

© Ramakant Sharda – http://ClickManic.com
Now set the white balance to daylight or whatever setting is appropriate according to the light and your taste. Set aperture to f/8 or f/11 because you will need a deeper depth of field and then focus manually. Now you need to set the exposure. Take a shot at aperture priority mode and see the picture. It should not have any clipping. If the picture is perfect, set the camera on manual exposure and set shutter speed similar to the last picture you took.
Shooting:
Now you are ready to shoot. If you are taking a 180-degree panorama, you need to start from a point and come back to the same point.
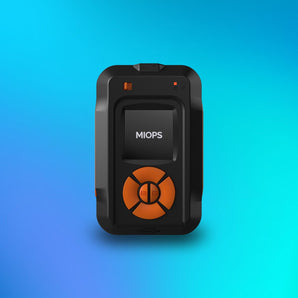
Now you have two options for shooting, first you can shoot manually by panning the camera and take the shot and second option is that you can use an automatic device like MIOPS Capsule PRO Versatile pan and tilt head that can do everything for you with more precision. The second option is easier than the first one.
Versatile pan and tilt head for time-lapse, multi row panorama, 360 product photography and videography.
MIOPS CAPSULEPRO
Loose the panoramic rotation knob of the tripod and take one shot. Now rotate the camera a little bit and take another shot and keep doing it until you reach up to starting point. Here you need to remember that there should be at least 20-25% overlap between each image otherwise you’ll have problem stitching later.
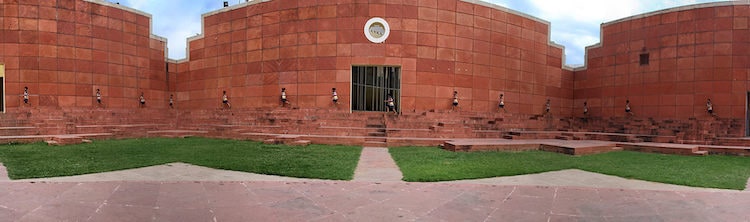
Check the following image. Blue one is the first image and red one is second. The gray part between both images is the overlapped part. You need to do it between every shot.
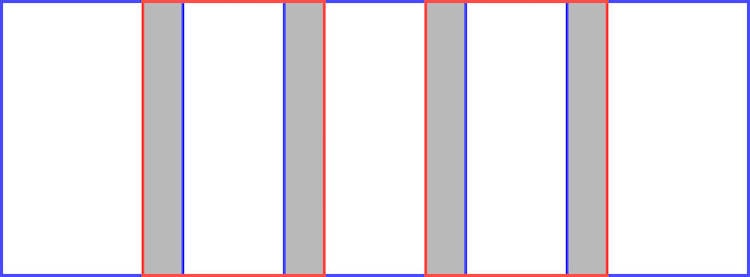
© Ramakant Sharda – http://ClickManic.com
Also, keep an eye on the horizon in each picture. It should be at the same level in all pictures. If it’s not it means, the camera is not straight. Fix it first and start again.
Things to Remember:
1. Reach early: Always try to reach early at the location so you have plenty of time to set up everything and take a test shot.
2. Shoot in RAW: Always shoot in RAW so if you made any mistake in camera settings, you have a better chance to correct it later on.
3. No elements in the foreground: This is very important. Always remember that you don’t have elements in foreground that are very close to the camera. If you have, you’ll have parallax problem when you stitch the photos. Parallax problem is a very big subject and we’ll talk about it in the next article.

So, let’s find some beautiful locations and start shooting. In the next article, we’ll learn how to stitch photos using panorama software.
About the Author
Ramakant Sharda is an author, iOS App publisher, passionate photographer and a MIOPS Ambassador based in the beautiful “Pink City” of India, known as Jaipur. His work has been published in various magazines, newspapers, and blogs. He has published three Coffee Table Books, he writes about photography and also teaches photography in his workshops. Check out his website http://ClickManic.com to see the masterpieces created by him or download his free app for iPhone and iPad “30 Days to an Ace Photographer“.
Related Article: High Speed Photography Explore Site