


This guide specifically targets enthusiasts beginning their journey into night sky photography. Whether you're wielding a DSLR or a mirrorless camera, this article will navigate you through the essentials of astrophotography. From understanding the types to mastering camera settings and choosing the right gear, we've got you covered.
Introduction to Astrophotography, Long Exposure and Star Trail Photography
Astrophotography is all about taking pictures of space objects like the moon and stars, and special sky events like meteor showers. When you capture a big part of the sky full of stars, that's astrophotography too. Popular types of this photography include creating star trails and photographing the Milky Way.
For long exposure photography, which is key in astrophotography, you need to keep the camera's shutter open longer than you usually would. While a one or two-second exposure might be enough for indoor photography, it won't work for capturing the night sky. Astrophotographers often start with exposures of five to ten seconds to try different settings.

Standard exposures can range from 30 seconds to 15 minutes, depending on how faint the object is and the lens you're using. This is where devices like the MIOPS Smart+ camera trigger come in handy. It lets you control the exposure time precisely, ensuring you capture the beauty of the night sky without any shake from manually pressing the shutter button.
For those new to this hobby, remember that it requires patience and a good grasp of photography techniques to get that stunning shot regardless of your camera setup. The time and effort you put into this photography type are worth it as the results can be truly spectacular.
Challenges of Photographing the Night Sky
Photographing the night sky with a DSLR or mirrorless camera is more accessible now than ever. Modern cameras excel at high ISO settings, crucial for capturing the stunning details of the night sky.
Before you start shooting, it's essential to know your location and what you want to capture. This foresight is especially important. You'll want to avoid any unwanted elements like tree branches or city lights in your composition.
Planning is key, and tools like the Sun Moon Expert Photo Planner app are invaluable. They help ensure that features like the Milky Way complement your foreground elements perfectly, enhancing your star trails and long exposure shots.

Getting your camera settings right is crucial in long exposure night photography. Adjusting the aperture, shutter speed, ISO, and white balance is vital to capturing the perfect shot. These settings depend on the lighting, your subject, and how much blur or noise you want in your image.
Using the appropriate camera accessories can significantly enhance your photography experience. They help improve your shots and keep your camera stable – a must for capturing clear star trails. Safety is also a priority when shooting at night, as you may encounter wildlife, theft, or bad weather.
Composition is another challenge. Finding a strong focal point, framing your scene effectively, and adding drama are all part of the creative process in this photography. Post-processing is the final step, where you can fine-tune your images, adjusting for graininess, color balance, and exposure.
To summarize, successful photos requires thorough planning and preparation. Know your equipment, location, and the shot you aim to capture. Envision, plan, and then execute to capture the breathtaking beauty of the night sky, be it star trails or long-exposure celestial scenes.
Types of Astrophotography
Astrophotography is a fascinating and challenging genre of photography that captures the celestial wonders of the night sky. For beginners with a DSLR or mirrorless camera, a good start is photographing the Moon, star trails, and even some basic deep-space objects.
Wide-field Astrophotography
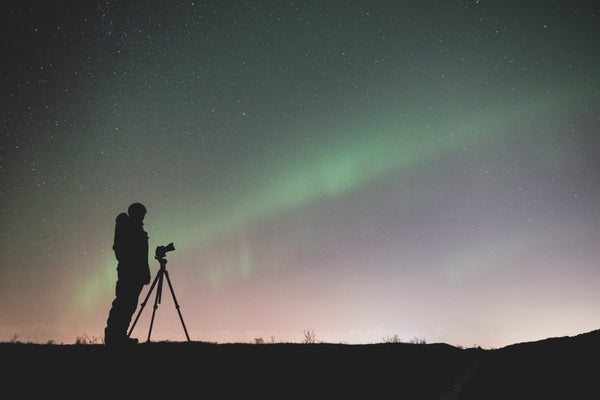
This involves using a wide-angle lens to capture vast sections of the night sky, often including a landscape feature. It’s a great way to showcase the grandeur of the Milky Way, the glow of the aurora, or the mesmerizing paths of star trails with our planet. Beginners often use a DSLR camera with a wide-angle lens for this kind of photography to take pictures of starry skies or star trails over landscapes.

Deep-sky Astrophotography
This advanced form targets faint and distant objects in the night sky, like nebulae, stars, and galaxies. The aim is to bring out the intricate details and colors of these distant celestial bodies, invisible to the naked eye. It requires more specialized equipment, including a telescope, a camera capable of long exposures, and a tracking mount to follow the sky's motion.
Solar, Lunar, and Planetary Astrophotography
This type focuses on capturing the sun, moon, and planets within our solar system. The objective is to detail features like sunspots, lunar craters, planetary rings, and moons. While telescopes are commonly used for these shots, a DSLR camera with a super-telephoto lens can also yield impressive results.

Time-lapse and Star Trails
An extension of wide-field, this involves taking multiple images of the night sky over time, and then merging them into a video or a single composite image. The goal is to showcase the sky's motion, like the stars' rotation, the moon's movements, or a comet’s journey. The same technique is used to create captivating star trail images, illustrating the Earth's rotation relative to the stars.
Milky Way Long Exposure Photography
This type focuses on capturing our home galaxy, the Milky Way. Light pollution can make it challenging to see its details, so astrophotographers often seek out remote, dark locations. Essential gear includes a wide-angle lens, a tracking mount for long exposures, and a camera capable of such exposures.
Milky Way long exposure photography is particularly awe-inspiring, showing the vast beauty of our galaxy. With the right equipment and technique, stunning images can be captured, even without tracking.
Remember, tools like the MIOPS Smart+ camera trigger can greatly assist in capturing these types of images, especially for long exposure and time-lapse photography. They allow for precise control and stability, essential for the clear, detailed images.

Essential Gear for Astrophotography
The best equipment depends on your budget and what's available to you. While smartphone cameras are improving rapidly, a DSLR camera with interchangeable lenses is more suitable. A DSLR with strong low-light capabilities is ideal. Full-frame sensor cameras are preferable for their larger sensor area to capture more light, but crop sensor cameras can also achieve good results.
When choosing a DSLR or mirrorless camera and capturing star trails, factors like sensor size, resolution, noise performance, battery life, and lens compatibility are important.
For lenses, start with what you have, like an 18-55mm kit lens. If you have faster lenses like a 14-24mm f/2.8 or primes like a 24mm f/1.4, those are excellent choices too.
A tripod is essential for all types of night sky photography. Since you'll be keeping the camera steady for several seconds to minutes, a sturdy tripod, ideally with a ball head, is crucial.
The MIOPS Smart+ allows comprehensive remote control through a smartphone app, managing shutter speed, shot intervals, and more. With this device, managing the shutter, aperture, and exposure values becomes effortless, making it a game-changer for capturing star trails and long exposures.
Planning Your Astrophotography Shoot
When planning your photography session, tackling light pollution is a key challenge. For clear, detailed images of the night sky, you'll need to find a dark sky area, far from the bright lights of the city.
A big part of shoot planning is knowing exactly where in the sky your subject will be and how it fits into your composition. The night sky is in constant motion, with the position of stars and the Milky Way changing throughout the year. Knowing where your celestial subject will be at the time of your shoot is crucial. To assist with this, smartphone apps like the Sun Moon Expert Photo Planner are invaluable.
Incorporating the Sun Moon Expert app into your photography process can significantly enhance your results. Here’s a quick rundown:
Dream: Visualize the scene you want to capture. It could be anything from a landscape silhouette against a sunset to the Milky Way arching across the sky.
Plan: Use the Sun Moon Expert app to determine the perfect time for your envisioned shot. The app provides detailed information on sun and moon positions, Milky Way alignments, and more.
Capture: Armed with this data, head out to your chosen location, set up your gear, and capture that magical moment.
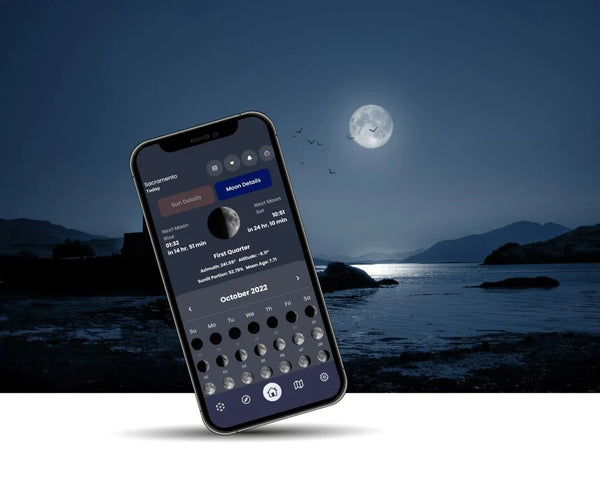
In astrophotography, where precision is key, tools like the Sun Moon Expert app are crucial. They bridge the gap between missing a shot and capturing a stunning image. With the ability to track celestial bodies accurately and plan comprehensively, you’re well-equipped to turn your photography dreams into reality.
Camera Settings for Astrophotography
In astrophotography, where you're capturing objects in low light, understanding and adjusting your camera settings is key. The two main factors controlling your exposure are shutter speed and aperture. In this photography type, you'll mostly be working with long exposures.
Shutter Speed
Shutter speed refers to the duration for which your camera's shutter remains open to allow light to hit the sensor. For astrophotography, a longer shutter speed is necessary. However, the longer the shutter is open, the more you'll capture star trails due to Earth's rotation.
If you want to avoid star trails in wide-field astrophotos, it's important to know how long to expose before trails appear. The Star Trail Calculator or the 500 Rule/NPF Calculator in the Sun Moon Expert app can help determine the right shutter speed for your shots.

ISO
ISO measures your camera sensor's sensitivity to light. Higher ISO settings make your image brighter but can also increase graininess. In astrophotography, a balance is needed — a high enough ISO to capture faint celestial objects without adding too much noise. Typically, ISO settings between 400-1600 work well, but you can go higher if necessary and correct some of the noise in post-processing.
White Balance
White balance removes color casts to give you neutral whites in your images. It's crucial in astrophotography to manually set white balance to capture the true colors of stars and planets. While the daylight setting (around 5200K) is a common choice, night sky images often require cooler settings in the 3200-4800K range. Experiment with these settings to see what works best for your images.
Summary of Settings for Astrophotography
Capture your images in RAW format to ensure the greatest flexibility in post-processing editing.
Set your focus to Manual.
White Balance: Start with the daylight setting and adjust as needed (around 3200-4800K).
Aperture: Use the widest setting possible for your lens.
Shutter Speed: Use the Sun Moon Expert 500 Rule/NPF Rule calculator to find the ideal setting based on your focal length.
ISO: Adjust between 400-12800 based on your histogram.
Use the MIOPS Smart+ remote to trigger the shutter. This tool is especially helpful for long exposure shots, as it minimizes camera shake and allows precise control over your exposure times.
By mastering these settings and utilizing tools like the MIOPS Smart+ and the Sun Moon Expert app, you can significantly enhance your experience, capturing stunning images of the night sky.

Practical Tips for Successful Astrophotography
Here are some practical tips:
Choose the Right Camera and Lens: Use a camera that excels in low light conditions, like a DSLR or mirrorless camera. For lenses, wide-angle ones are great for capturing expansive sky scenes like the Milky Way, while telephoto lenses are ideal for zooming in on specific celestial objects.
Sturdy Tripod is a Must: A solid tripod is crucial to avoid camera shake and blur. Make sure it’s well-positioned and stable before you start shooting. Any movement during a long exposure will disrupt your image.
Pre-Plan Your Shoot: Research and plan when and where to shoot your chosen subject, whether it's the Milky Way, the moon, or planets. Certain times of the year offer better visibility for different celestial objects.
Camera Settings: Switch your camera to manual mode for both exposure and focus. Opt for a fast aperture (between f/2.8 and f/4), a high ISO (ranging from 400 to 1600 or higher), and a long shutter speed (15-30 seconds or more). Utilize the rule of 500 to prevent star trails.
Shoot in RAW: This format preserves the most detail and color in your images, giving you more flexibility in post-processing. Use the histogram to ensure you’re not losing details in the highlights or shadows.
Focus Manually: Use manual focus to ensure sharp images and employ a remote shutter release or self-timer to prevent camera vibrations. For precise focusing, use live view and zoom in on a bright star or distant light.
Post-Processing: Edit your images to enhance colors, contrast, sharpness, and reduce noise. Programs like Photoshop, Lightroom, or Aperture offer extensive editing capabilities, particularly beneficial when working with RAW files.
Remember, tools like the MIOPS Smart+ trigger can greatly enhance your experience, especially when it comes to managing long exposures. It minimizes the risk of camera shake and allows precise control, ensuring sharp, clear images of the night sky.
In conclusion, astrophotography offers an awe-inspiring gateway into the wonders of the night sky, blending the art of photography with the majesty of celestial phenomena. By equipping yourself with the right gear, understanding the crucial camera settings, and employing practical tips, you can capture breathtaking images of the cosmos.
Whether you're photographing the Milky Way, chasing star trails, or capturing long exposures of distant celestial bodies, remember that patience and practice are your best allies. Tools like the MIOPS Smart+ trigger and the Photo Expert app can significantly elevate your experience, providing the precision and control needed for stunning photography. So, venture out under the starry sky, embrace the challenges, and immortalize the beauty of the universe through your lens.


