


Astrophotography is a very interesting genre of photography. In astrophotography, we photograph astronomical objects, the night sky and celestial events. We not only record the details of the moon and other planets, but we also click the images of dim stars, nebulae, and galaxies that are invisible to the human eye.
We do it by using long-time exposure because a camera can record low light over the long periods of time. If our exposure time is longer (a few minutes or more), polar alignment is required.

What is polar alignment and why we need to polar align in astrophotography?
The earth is rotating on its axis and if you are using longer shutter speed, the stars will start showing trails. So, in this situation, you have only two options either increase the ISO to lower the shutter speed or use a device like MIOPS Capsule360 to rotate your camera with the same speed of earth rotation so your frame is aligned with your subject during the entire exposure time.
If you increase ISO, your picture will have lots of grains and it’ll be ruined, so you have only one option and that is using Capsule360. Before using Capsule360, we need to do a polar alignment. In this process, we align the rotational axis of screw of Capsule360 with the north celestial pole to parallel Earth's axis so the polar axis does not move when you move the Capsule 360 reverse direction of rotation of the earth. Thus, the stars are not showing star trails.

According to the dictionary, the definition of the polar axis is “the axis of an equatorially mounted telescope which is at right angles to the declination axis and parallel to the earth's axis of rotation, about which the telescope is turned to follow the apparent movement of celestial objects resulting from the earth's rotation”.
What are the manual methods?
We are going to use two methods in this article. Both methods are identical, the only difference is that in one method we are using the camera and in the second method, we are using a mobile phone.

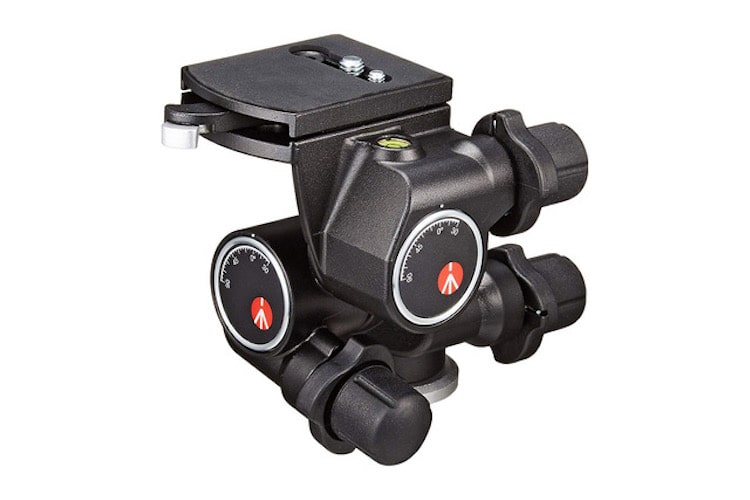
You need a steady tripod for astrophotography. Mostly we have a ball head with our tripod which is not a good choice if you are doing a polar alignment. A geared head is the best choice for this. This head can be rotated 360°, tilted 90° forwards or 30° backwards, as well as 90° sideways.
It comes with three knobs that allow you to rotate it with all three axes for precise and easy adjustments. It also has a locking system that lets you move quickly and its inbuilt leveling bubble improves the accuracy of your settings. It also has dedicated angle scales for each movement.
Okay, let’s start the alignment. First level the tripod, it should be leveled accurately otherwise you would not be able to follow the object precisely. Now use a compass or your smartphone's compass to find the north direction. Set your tripod screw in a way that is facing north and put the Capsule360 to your tripod. We need to align (turn) the screw of Capsule360 with the Pole star or Polaris. You can find the Polaris by using Capsule360 mobile app provides you angle of view automatically or you can enter it manually. The angle of view is calculated based on your location. Tap to "device position" button and set to position of Capsule360 by changing the angle of dip. Finally, you must fine-tune on the position of Capsule360 manually to make Polar Alignment.

Capsule PRO
La cabeza versátil de panorámica e inclinación para lapso de tiempo, panoramas de varias filas, fotografía de productos a 360...
Warning: After the completion of all steps, you can take long exposure but don't forget that the long exposure time is affected by accuracy of Polar Alignment and zoom value (focal point) which you used.
Also, every camera has a live view with a 10x zoom function. We can use that for polar alignment. Switch on the live view and zoom to 10x. Now rotate the knobs of head and try to place the Polaris exactly at the center of the screen. A geared head moves very slowly and you won’t have any problem in alignment. If you have ball head it’s very tough to do this that’s why I suggest geared head. Once the Polaris is at the center, your polar alignment is done.

Night Sky 2 app method:
This is the second method. In this method, we are going to use “Night Sky 2” app instead of a camera. Put the Capsule360 to and attach your mobile as its face at toward by using phone holder (use the phone holder which has two tripod mounts for using horizontally and vertically.) on your tripod. Make sure your tripod is leveled and also your mobile fit on tripod correctly.
Set your tripod as your phone face at toward north of the sky its 15 degrees up and watch as the celestial bodies appear on your screen.
Now open the app and you should see the Polaris on screen. “Night Sky 2” gives you the option to zoom, so zoom it full and rotate the knobs of tripod screw and put the Capsule360 to tripod by placing the Polaris exactly at the center of the mobile screen.
These are the two methods for polar alignment for astrophotography without using any special equipment.
Related Article: Star Trails Photography: Camera Equipment, Settings, and Exposure
About the Author
Ramakant Sharda is an author, iOS App publisher, passionate photographer and a MIOPS Ambassador based in the beautiful “Pink City” of India, known as Jaipur. His work has been published in various magazines, newspapers, and blogs. He has published three Coffee Table Books, he writes about photography and also teaches photography in his workshops. Check out his website http://ClickManic.com to see the masterpieces created by him or download his free app for iPhone and iPad “30 Days to an Ace Photographer“.


