


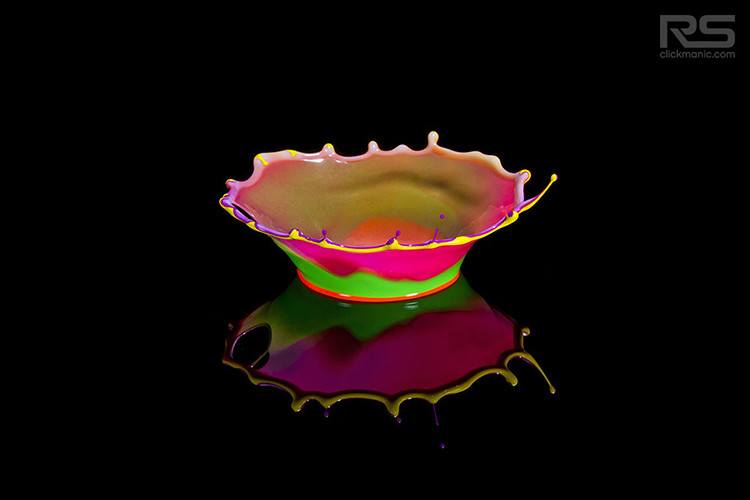
Crowns are usually worn by rulers and it represents power and glory. Most of us are not privileged to wear a crown but luckily we can create stunning crowns using watercolors and a high-speed photography technique.
So, without further delay, let’s talk about how to create extraordinary color crowns with water drops.

What you need:
For this high-speed photography, first you need a piece of black glass, it should be around 20 inches by 15 inches. You can use some other surface that is black but glass will have a reflection of the crown which will be looking good.
Second, you need something to drop water or milk on colors to create a crown. You can use a plastic bottle with a tiny hole but it’ll give you no control over drop size and timing. The second option is an IV Set (the tube that doctors use to give ‘drip’ to patients) that will give you more control over drop size and you can also control when the drop will fall.

Splash Pro Pack | Water Drop Photography Kit
Controls every drop and your equipment with great precision to capture the perfect splash.
But if you want total control over the size of drop and accurate timing, MIOPS SPLASH – WATER DROP KIT is the answer, it can not only control the drops but also fire your flash at the perfect moment.
Next, you need something to hang your IV set or plastic bottle. It should be around two feet high from the glass. You also need a piece of black cloth for the background. Other than this you need three flashes, camera, shutter release cable and a tripod. We are going to use laser mode of MIOPS Smart high-speed camera & flash trigger to fire our flashes so we need a laser pointer as well.

Setup:
Like other high-speed photography techniques, we need to do some preparations first. Place the black glass on a table and place black cloth behind the glass somewhere so background becomes dark. Next, hang the IV set around two feet above the glass and place another end of it in a glass of water or milk. Make sure this glass is placed higher than the IV set.
Now we’ll do the light set up and for that, we are using three flashes. Place two flashes both side at forty-five-degree angle, and hang the third flash at the top so that top of the crown is also exposed properly. You can set the power of all three flashes to 1/128 but if top flash is far from the crown compare to other two flashes, increase its power accordingly and make sure all flashes are set at 1/32 or lower power so that there is no motion blur in the picture. If the light is not enough, you can always increase ISO in your camera.

Your one flash will be connected to the MIOPS high-speed photography trigger and other two flashes will be in slave mode so they will fire automatically when your first flash is fired.
Now place MIOPS Smart at one side to the path of your drop and place laser pointer at another side. You need to set it in a way that when you release the drop, it’ll cut the laser beam so MIOPS Smart can fire your flashes. It’s the trickiest part of this photo but MIOPS Splash can save a lot of trouble for you.
When it’s done set your camera on a tripod and attach a shutter release cable.
Camera Settings:
Camera settings are quite simple, set your aperture to somewhere between f/11 – f/16 for deeper depth of field, we are going to use Bulb mode for this and you may need an assistant to release the shutter. Set your ISO to 100 and take a test shot. If you feel it’s dark, increase the power of flashes. We are using three flashes and flashes are placed very near to the subject so you probably no need to increase ISO. Now focus manually where your drop will fall and create the crown.

Workflow:
Now our camera is on a tripod with manual focus, we have three flashes ready, our laser beam and trigger is ready, let’s start taking shots.
Now open IV set to release a drop and keep your eye on it. It’ll cut the laser beam and then fall on the glass and in between the flashes will fire. You need to set the delay time for MIOPS Smart. It should be between 150-250 milliseconds depending on the distance between trigger and the glass top. Make the changes in delay settings until you see the crowns are being made when the flashes are being fired. Once your delay time is set, clean the glass and it’s time to take actual shots.
Place 3-4 drops of different colors on the glass, when the drop from the top will fall on these color drops, it’ll create colorful crowns that your camera will capture.
Now the workflow is, place the color drops on the glass, instruct your assistant to open the shutter and close it as soon as the flashes fired. Release a drop from IV Set and check the masterpiece you just created.
Again clean the glass top and repeat the same process. Initially, you may not get perfect shot but with some practice and patience, you’ll start getting it. So all the best and don’t forget to share your shots here.
Related Article: https://www.miops.com/how-to-take-extraordinary-lightning-photos/

About the Author
Ramakant Sharda is an author, iOS App publisher, passionate photographer and a MIOPS Ambassador based in the beautiful “Pink City” of India, known as Jaipur. His work has been published in various magazines, newspapers, and blogs. He has published three Coffee Table Books, he writes about photography and also teaches photography in his workshops. Check out his website http://ClickManic.com to see the masterpieces created by him or download his free app for iPhone and iPad “30 Days to an Ace Photographer“.


